Thursday, 21 July 2011

Guest Blog: Featuring the artwork of Loose-legs Lawson.


My sister Tricky has asked me to be a guest on her blog this week.  I don’t have a cool nickname like ‘Tricky Hickson’ so… call me… Easy Lawson. No that won’t work…

Anyway, I’m going to show you step-by-step how to paint a portrait using soft pastels.

To create this magnificent piece of art that will hang in your parent’s hallway proudly, and for which you will most likely only get paid in the form of a sushi lunch with your mum, you will need;

Conte Paris Pastel Pencils
Art Spectrum Soft Pastels
Faber Castel Sketching Pencils
Eraser
Photo for reference (unless ridiculously talented you can do it from memory only)


I chose to draw our beloved Daschund Neuman. Although he’s no longer with us, this drawing captures him perfectly and pays homage to adventurous life he led. It might be creepy if you painted my dog so feel free to paint your own beloved pet, family member or celebrity crush. Or you could combine two of those things and paint Robert Cattinson:


First start off by sketching a pretty detailed outline of your subject. This is by far the most important stage and can make or break your final piece if you don’t spend enough time perfecting it. So don’t fuck it up!


Once that’s done, you can begin colouring with the pastels. Pastels are essentially like chalk but they can be smudged and blended to create a smoother finish. I like to start with the eye area because it really brings the subject to life. (Unfortunately, not literally. RIP). The most important part of the eye is the pupil and the reflected light which can be achieved by a quick swipe of pure white over the pupil.  It gives the eye more dimension. If the dog you’re painting is also black, or your painting a person with black hair, make sure to not just use straight black. Mix in some blues, tans, yellows, browns and skin tones where necessary. Keep checking back on your photo for reference.


Work your way around the ears. See all the different colours in the hair that I’ve used? This also applies to painting humans. A blonde girl might have whites, yellows, creams, umbers, greys or even blacks in her hair. It would never be a straight colour. The strokes should obviously go in the same direction as the hair would. The good thing with pastels is they can be smudged and mixed on the page, and you can rarely fuck it up because you can go over the top of it as many times as you like. Good news for novices!


I’m working my way through the picture in a logical order of the direction of the hair to keep it all flowing naturally.
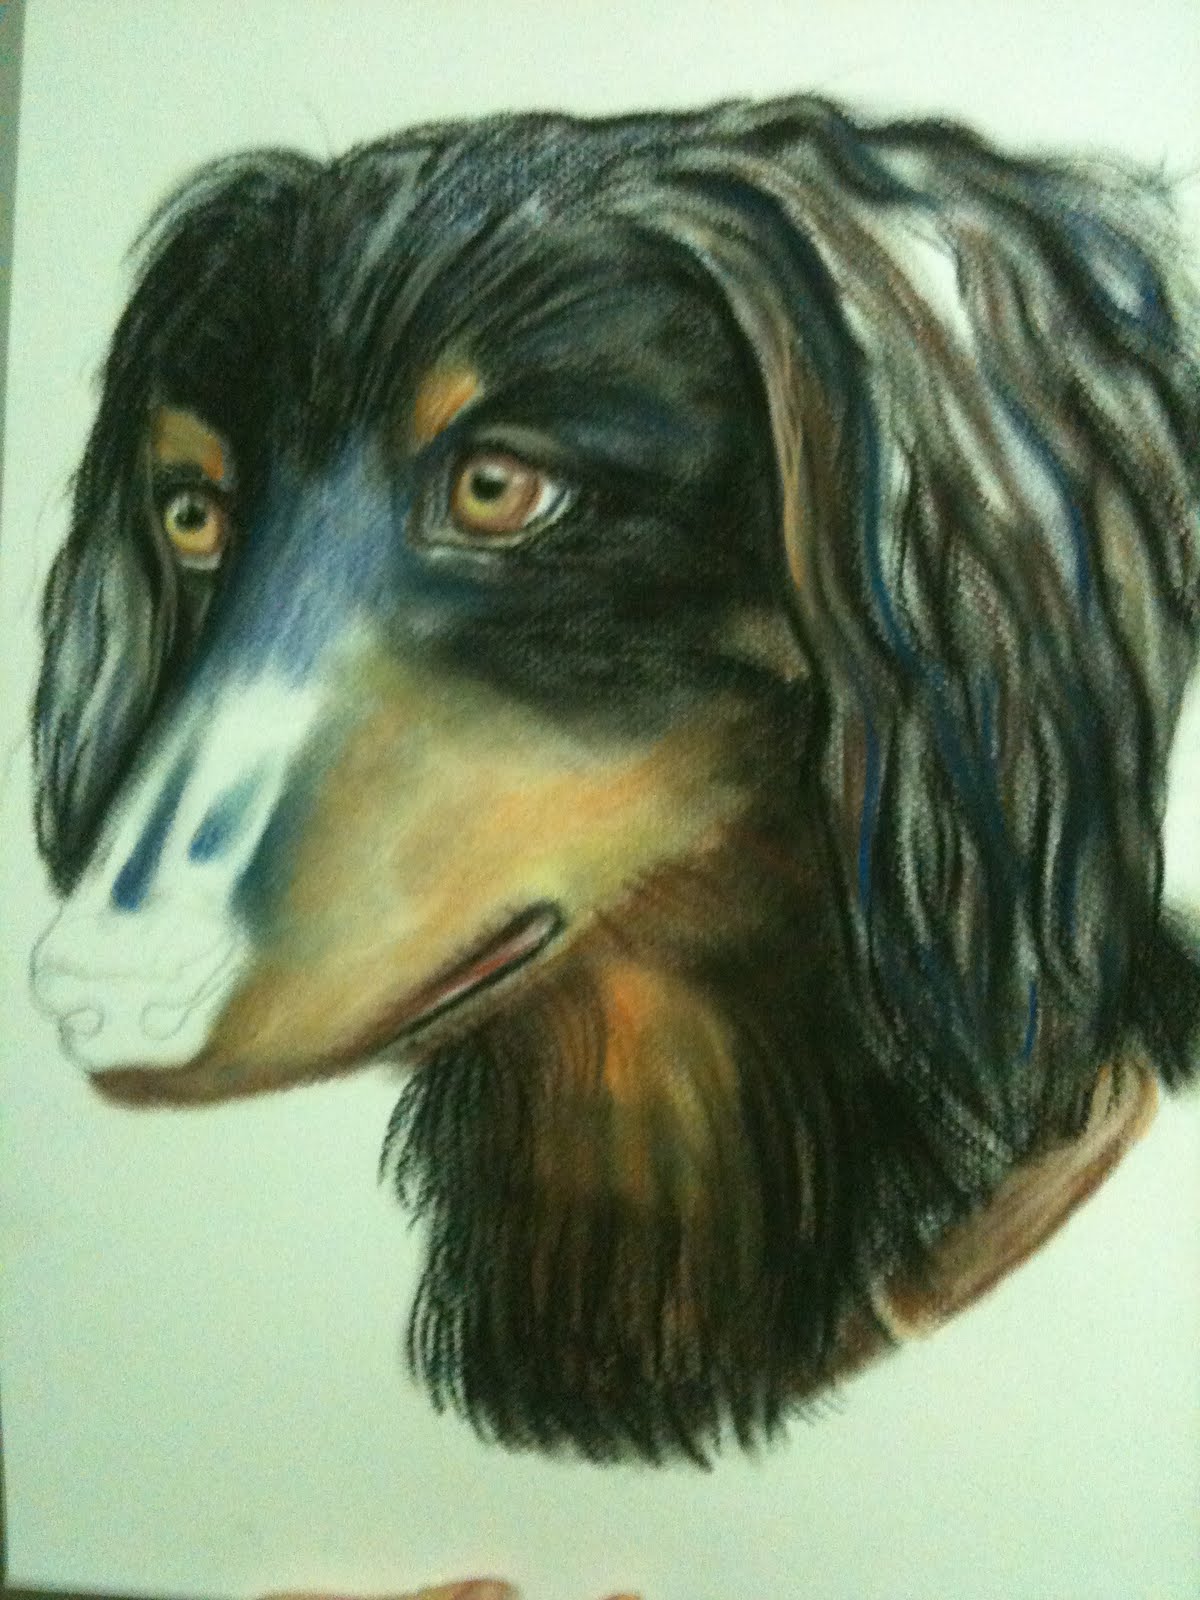


Almost finished. While the painting could be finished here, I like to go over them at the end with a white pastel and highlight any areas that are hit by sun or light. Also to draw in any grey hairs or whiskers or any finishing touches.


And voila! The painting is complete. And I’m very pleased with how it’s come along. Give it a decent spray with hair spray to set and it’s ready to be framed.

Here is a super close up of the eye area to show you what pastel looks like close up and how much detail goes into each piece.


My guest blog post might not have been as lol-worthy as Tricky’s normal posts but I hope you found it informative enough to go and pick up a pack of cheap pastels from Stacks and give it a go! Or not be pov and actually fork out for some proper materials from an art store. Either way, good luck my fellow artistes!

Monday, 18 July 2011

This jewellery 'looks' good!

Most girls like looking at jewellery, but what a lot of people don't know is jewellery really likes looking at you too...


Enter: Eyeball Ring Thing.....

It was my friend Lauren Confos's birthday over the weekend so I decided to make her something I thought she would like. I once saw her wear a dress with eyeballs on it, so, that was pretty much what I was going by. I mean, she HAS eyeballs, so surely she likes them...

And this was really fun to make, I also made matching hairclips to add to her collection of about 1000000 hairclips...

You will need:

Large teddy bear eyes
White paint
Red texta
Brown, blue, green, yellow paints (or whatever colour you want the iris to be)
Paintbrush
Ring/hairclips
Hacksaw, or steak knife you don't mind blunting the shit out of - I went for the latter cause I'm badass
Coloured textas
Black marker
Flesh coloured material
Super glue
Scissors
Hairspray
Wine... to help with the.. sealing, of the.. glue...thing..........Fuck, I don't know.
First get the teddy bear eyes (about $4 a pack from Spotlight), about this size.... Have a drink of wine.


Then paint it white, like an eyeball. It will need a few coats, so I sat there with a hairdryer and dried each layer to speed up the process. It helps to sip your wine while you blow dry the eyeball.

Then get your main colour, ie green and paint an iris. Put lighter flecks through or use yellows or other colours to get a realistic looking iris. Once you are happy, spray it with hairspray to give it that realistic glazed look. Do this before applying texta for the detail or the texta will run. Use a red texta to draw on little red veins and the black marker for the pupil. Have a drink of wine then put a dash of white on the pupil to make it look like a reflection.  


Grab your hacksaw - aka steak knife - (probably shouldn't have had all that wine before....) and saw off the back `spike bit' of the eye. Pretty sure that's the technical term..... It helps if you have plyers handy too. Then cut out two strips of the flesh material and fold a crease to form 'eyelids' and glue them down. Try not to glue your fingers together like I did because your skin WILL peel off and it WILL hurt like a bitch. Once it's dry you can glue it on to a ring or clips as so:

You can even glue it to a bow! Wow, the possibilities! No... wait, that's pretty much it....


Don't they look pretty!


I made a few different coloured ones but here are the finished products... Stop....it's wine time!


I wore mine to the shops and totally got looks... so yeah.

xoxo Tricky

Tuesday, 5 July 2011

Beerings.. beers for ya ears!

Beer + Earrings = Beerings! There's some interesting word-math for you.

If you're like me, you are constantly thinking, 'How can I show my love of beer to the world even more?' then don't fear, because now you can make your very own Beerings and hang those lagers from your lobes.

I decided to make the earrings for my mate Bridie Jabour's birthday. Cause she's part Irish and she loves beer. It was either that or earrings with the word c*nt on them, because that is one of her favourite words, especially when she gets vintage Bridie road rage.

But I thought that would be a bit crass, even for her, so I went with the beers. (Bridie also has her own blog, you can read it here - she is funny.)

But here is what the earrings turned out like:

(close to actual size)


(Now for the close-up - this was probably close to the actual size pre-shrinkage)

These are made on shrink plastic like the David Bowie necklace in one of the previous posts and took about half an hour so to do. But if Bridie is reading this, it took like hours and hours and I put in heaps of effort...

Same process as before, draw the picture you want relatively big on shrink plastic (available from Spotlight for about 15 for 6 sheets), sand the paper really well, draw and colour and punch a hole in it, then bake on a low heat in the oven on some baking paper for about 3 or so minutes or until shrunken and flat. Add earring fastenings. (see previous post for materials and more detailed technique explanation).

I didn't manage to get a picture of Bridie wearing these unfortunately, but here is a picture of her anyway.
So Irish.....


Tricky xoxo

Tuesday, 28 June 2011

The time I ruined Christmas...

(Awesome drawings by Maria Lewis - aka Movie Mazz. Totally made me look hawt. She has her own blog for all your warm-blooded movie love which can be found here.)

Sometimes, there comes a time in a woman's life where she fails horribly at something. For some, it happens rarely. For me, it happens frequently and generally revolves around trying to make food. Here is my sad tale about the time I ruined Christmas....
For some stupid reason, I thought it would be an awesome idea to construct a gingerbread house for Christmas. I always wanted to be a builder when I was a kid, until I realised I have weak girls arms and hate manual labour but I DO love gingerbread - so it was a logical step to combine my former childhood dreams and my current desire to mung out on gingerbread.

I had grand plans of a multi-level construction with a mezzanine, A-frame roofing - the works. So I trundled off to the supermarket and bought close to $50 worth of lollies and other ingredients to create this monstrosity:

(note how 'clean' everything is...)
I hear you saying, "Hey, Kate, don't be so hard on yourself, it somewhat resembles a house and I'm sure it's of sturdy construction..." False... it is not.

After about 5 hours of baking, decorating and generally putting my heart and soul into my creation, I turn my back for one second and hear an ever-so-gentle, barely-audible thud. Before I even had the chance to turn around, I knew.... My life-long dream that I'd had since that morning was dashed. My roof had collapsed - and so had my dreams.


Being the cool, calm, undramatic type, I let out a blood-curdling "Noooooooooooooooooo!" and dropped to my knees in despair. In true lady-like fashion, I was gracious in defeat and punched it... I punched the gingerbread house in it's stupid gingerbread house face, cracking the shits in vintage Kate style.

I take things really well.

Lucky for Manny, he got to eat A LOT of gingerbread rubble that day... and for the rest of the week....

That is the last time I try to do something festive. Bah-humbug! (seriously, what the fuck does that mean... quick, somebody Google it..)

Tricky xoxo
  

Wednesday, 1 June 2011

David Bowie shrink plastic fantastic

Ground control to major Tom... how cool will you look wearing this around your neck.


It's my David Bowie shrink plastic necklace!

Remember when you were a kid and you used to eat Smiths Chips and then put the empty packet in the oven and shrink it to make a mini little packet of Smiths Chips? Or your mum bought you Home Brand ones and you shrunk them and then they looked like shit, cause they were home brand?

Well here's something to bring back that nostalgic childhood past-time of playing recklessly and unsupervised with an oven!

What you will need:

Shrink plastic sheets (Or number 6 plastic container)
Black marker
Coloured markers
Scissors
Hole punch
Oven
Baking paper
Sand paper
Leather thong string

Get the sheet of plastic ($15 for 6 sheets A4 at spotlight) and sand paper that bad boy till it's really rough otherwise the markers won't stick.
Once you've sanded it, draw whatever image you want on it and colour it in. Make sure you draw the image fairly big, about a quarter to a half an A4 peice of paper size as it will end up being just bigger than a 20 cent piece.

<--- Here's how mine looked before I shrank it.

You then put it on an oven tray over baking paper and bake it on about 150 degrees for about 5 minutes. Just keep an eye on it though and take it out once it is completely flat again.

I was really 'under pressure' when I put this in the oven because something I was warned about - but not really prepared for - the plastic will curl up and fold in on itself and will make you think 'Oh god, that 45 seconds I spent tracing this picture off a google image is wasted, I will never get that time back, I might as well stick my head in the oven and gas myself to end this world of pain I'm in'.
But fear not, because it's meant to do that and it eventually sorts it's shit out and flattens nicely to form a harder, thicker, and noticibly smaller peice of plastic which can be used for just about anything! - a necklace... some earrings... umm.... a....

I actually made my mum a mother's day card on shrink plastic so it turned into a small little keepsake I'm sure she's already lost somewhere... I would post that up here too but I wrote a hell lame poem on it, and that would only embarrass me. Plus I don't want people knowing I still write my mum poems... oh wait....

Conversation diversion....Here's before and after pics....


As you can see... *cue gasps of shock* the shrink plastic has shrunk! There must be some kind of sorcery afoot!

You can make just about any design on this stuff and it's really fun! I have more shrink plastic projects to show you later on. Yays!

Tricky xoxo

Tuesday, 17 May 2011

My cat in a duck suit

This is my cat Conan.....


As you can see, he is somewhat of a fashionista and likes to experiment with his looks. He doesn't live with me anymore but I am kind of glad about that cause he used to bite me a lot... and look at that shit-eating grin.

Anyhow I thought it would be a cute idea to make him a duck suit incase he ever got sick of being a cat. I didn't make the above jumper by the way, but I did make this.....

Quaaaack. Look how stoked he looks to be wearing something so fancy!

I can't remember how I made it because it was years ago, but I thought I would share anway, if only to embarrass and shame him on the interwebz. Look how silly he looks!


He is so 'above' this....his reputation as a cool cat is in jepardy of being tarnished.

It just needed some elastic under the chin to keep it on and it would have been perfect. But I liked how it turned out. It's pretty easy, just remember to leave feet holes in the legs so their paws can hang out!

xoxo Tricky

Monday, 16 May 2011

Creepy sloth baby FTW

After getting an email forward of sloths from Maria at my work, we realised how damn creepy they are. With their Monk-style bowl cuts, permanent little smile and their abnormally long arms, it's like god slapped them together with leftover parts and to add salt to the wounds, completed the look with an untrendy do.
But there is something about them that is just so damn cute. See?

At the realisation I'd never own a sloth pet of my own because apparently they `hate' being caged, and need to be 'free' in the wild, and 'Council would never approve of me keeping one in my apartment' I decided to make my own baby sloth pet. Take that mother nature!

Here's what he turned out like....


To make your own sloth that looks like it could possibly come alive at night and murder your whole family while maintaining a creepy smile during, then here's how!

You will need:
Half a metre of grey fur
10 cm of long brown fur - for sculpting his wicked do
Two eyes
A plastic dog nose
White paint
Paintbrush
Black felt for his claws
Black permanent marker
Hobby fill
Sewing machine
Needle and thread
Scissors
Craft glue
An exorcist on hand incase of aforementioned possessing.

Everything can be found at spotlight and will cost you under $20 AU. (That's like $100 American at the moment, Schwing!)

As you know, I don't use patterns, I just make it up as I go but here is the general guide of each part you will need:

I started with sewing his head because it was the most fun part. Look how cute.
So you sew the two face pieces to the nose and use the round peice for the top of his head. Sloths heads are really round, like, abnormally round.
Anyhow, once you've sewn together all the pieces, put in the eyes and nose in the squish-face formation and stuff it.
Then you get the brown fur and cut off some chunks for his brows and his monk hair. Glue those on.
Get your permanent marker and darken the fur around his mouth and trim some of the fur away to form a little sly-dog smile.
Get your white paint and use the brush to streak it across the bridge of his nose and above his brows to give him a bit of pizzaz.
Head = done and looking awesome.

Now sew together the torso, and limbs, making sure you cut out some claws to be sewn in when doing the feet and hands, sew them to the torso and use the white paint again to give him some streaky tones and highlights to brighten up his drab colour. Because he's worth it.

Soon you will have your very own sloth to love and watch Neighbours with.

CUE SLOTH MONTAGE:
Being pensive, contemplating life


Getting stabby


Nursing a hangover

 Giving Tricky kisses

 Take him on the bus, take him as your date to the school dance, take him anywhere you like... Just don't feed him after midnight, just in case.

xoxo Tricky